How to Use an Oscillating Multi-Tool
Here’s how to use an oscillating multi tool: match the accessory to the job, secure the work, check behind the cut, and guide the tool with light pressure. Start at the recommended speed and make shallow, controlled passes.
On this page (10 sections)
- How do you use an oscillating multi-tool step by step?
- Which blade or attachment should you choose?
- How should you set the speed and pressure?
- How do you make a plunge cut or flush cut?
- How do you change an oscillating multi-tool accessory?
- How do you use an oscillating multi-tool for sanding or scraping?
- What safety checks should you make before cutting?
- Which accessory set suits remodeling cuts?
- What mistakes cause rough cuts and early accessory wear?
- How to use an oscillating multi-tool for your next job
To learn how to use an oscillating multi tool, start with the right accessory, secure the material, and guide it with light pressure. Check behind the cut before starting, then use the recommended speed and shallow passes to stay on your mark.
Its small side-to-side blade motion suits short cuts, tight corners, scraping, and detail sanding. The accessory matters as much as the tool: a wood blade, grout cutter, and sanding pad need different setups.
How do you use an oscillating multi-tool step by step?
Prepare the cut before powering the tool, then make a controlled entry and let the accessory remove material. Practice on scrap when possible, especially before working beside a finished surface.
- Read the tool and accessory instructions, including speed limits and protective equipment.
- Unplug the tool or remove its battery before fitting an attachment.
- Install a compatible accessory for the material and check that it locks securely.
- Mark the work and clamp loose material with supports outside the cutting path.
- Inspect behind and beneath the cut for wires, pipes, fasteners, and framing.
- Choose the recommended starting speed and hold the tool as directed.
- Make a shallow first pass, then deepen the cut without forcing it.
Switch off and let the accessory stop before setting the tool down or repositioning it. Wear eye and hearing protection, and choose dust extraction and respiratory protection suited to the material.
How to use an oscillating multi-tool near a cut line
Keep the blade on the waste side of your mark, leaving room for its cutting width. Start with a shallow groove so you can check alignment before committing to the full depth.
Support the piece that will fall away without trapping the blade between closing edges. If dust hides the mark, stop the tool before clearing it.
Which blade or attachment should you choose?
Choose by material first, cut shape second. A blade that fits the tool can still be wrong for the work.
| Job | Accessory to choose | Main setup check |
|---|---|---|
| Short wood cuts | Wood-cutting blade | Check for embedded fasteners |
| Wood containing nails | Blade rated for nail-embedded wood | Confirm permitted fastener types |
| Drywall openings | Drywall-cutting accessory | Locate hazards behind the panel |
| Grout removal | Grout-removal accessory | Match the cutter to the joint width |
| Detail sanding | Compatible pad and abrasive | Keep the pad flat |
| Scraping | Scraper suited to the material | Use its recommended working angle |
A narrow blade helps with small openings, while a wider cutting edge needs enough clearance around the cut. Check accessory mounting compatibility as well as reach and cutting depth.
Our guide to common oscillating multi-tool uses helps you match attachments to jobs. For wall openings, follow the guide to using an oscillating multi-tool to cut drywall.
How should you set the speed and pressure?
Use the recommended speed with light pressure, then adjust only while you can keep the accessory on course. Maximum speed is not the starting point for every material.
A variable-speed trigger lets you ease into the work, while a selector or dial sets the available range. Make short passes near trim edges or finished surfaces and inspect progress between them.
If cutting slows, check the blade and material before pressing harder. A dull edge, trapped debris, or unsuitable accessory needs attention, not more force.
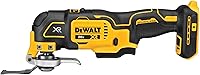
The DeWalt DCS356B suits buyers who already have a compatible battery and charger. Its brushless motor, LED, and wrench-free Quick-Change system suit repeated repair jobs that involve moving between cuts and attachments.
This tool-only version includes 2 wood blades; the battery and charger are separate. Skip it if you need a complete cordless setup, or if your first job needs grout, scraping, or sanding accessories rather than wood blades.
How do you make a plunge cut or flush cut?
For a plunge cut, enter gradually and control depth; for a flush cut, confirm that the blade can work against the reference surface. Neither cut should begin until you know what lies beyond it.
Mark the opening and follow the blade’s starting method. Establish a shallow entry, then deepen it in stages instead of pushing the full blade into the material at once.
A flush cut may help trim a door casing or remove a projecting piece, but the blade can mark nearby finishes. Protect those surfaces and check the blade’s clearance throughout its travel.
Don’t twist a straight blade around a corner. Stop, reposition, and start a separate cut rather than bending the accessory sideways.
For long cuts through thick material, compare a reciprocating saw vs oscillating multi-tool before choosing the smaller tool.
How do you change an oscillating multi-tool accessory?
Disconnect power and let the accessory cool before releasing it. Wrench-free changes still require the battery to come out or the cord to be unplugged.
Open the clamp or remove the fastener as the manual directs, then seat the replacement fully. Use the required adapter, check permitted mounting angles, and confirm the attachment is secure before restoring power.
An adapter expands accessory choice, but it does not make every attachment compatible. Check the mounting pattern and accessory limits rather than assuming that matching brands guarantee a fit.
The DeWalt XR kit suits first-time cordless buyers who need the power setup included. Its wood blade and wood/metal blade cover different cutting needs without requiring a separate battery and charger order.
Skip the kit if you already have compatible charging equipment and only need the tool. Also plan for separate task-specific attachments if your project centers on sanding, scraping, or grout removal.
How do you use an oscillating multi-tool for sanding or scraping?
Keep the sanding pad flat and moving, and use the scraper’s recommended angle. Pressure concentrated on a pad corner or scraper edge can leave marks that take longer to fix.
Choose the abrasive for the material and desired finish. Start in an inconspicuous area, work through suitable grits, and replace paper when it clogs or stops cutting effectively.
For scraping, begin at an accessible edge and work in short sections. Stop if the attachment digs into the base surface instead of lifting the material.
For grout removal, fit an accessory suited to the joint and keep it clear of tile edges. Our guide to removing grout with an oscillating multi-tool covers that task in more detail.
What safety checks should you make before cutting?
Confirm what is behind the work, because even a short blade can reach hidden services. A visible surface mark tells you where to cut, not whether the space behind it is clear.
If a cut could reach wiring, have the relevant circuit isolated and verified de-energized by someone qualified. Don’t proceed while the location of wires or pipes remains uncertain.
Keep hands, clamps, cords, and supports outside the accessory’s path. Identify possible lead paint or asbestos before disturbing older materials, and get qualified help when needed.
Disconnect power before clearing a jam or inspecting damage. Replace cracked, bent, or damaged accessories rather than trying to finish one more cut.
Which accessory set suits remodeling cuts?
Choose a cutting assortment that matches your planned materials, rather than buying extra blades without a job for them. For drywall openings and nail-embedded wood, the DeWalt 3-Piece Oscillating Assortment is a relevant option.
It contains the DWA4258, DWA4283, and DWA4270. The DWA4258 has a PlungePoint tip, while the three-sided DWA4283 is designed for drywall cuts and wood with nails.
Buy this assortment for those remodeling cuts, after confirming that the blades fit your tool. Skip it if you need a power tool, sanding setup, scraper, or grout cutter; a cutting-blade assortment does not fill those roles.
For broader attachment choices, read our guide to choosing an oscillating multi-tool. The oscillating multi-tools category hub gathers related tool guides and picks.
What mistakes cause rough cuts and early accessory wear?
Forcing the tool, using the wrong blade, and losing support are common causes of poor control. Correct the setup as soon as the sound, vibration, or cutting behavior changes.
- Pressing harder when progress slows: stop and check for wear, debris, or an unsuitable blade.
- Cutting beyond the required depth: plan the depth before entering the material.
- Twisting a trapped blade: stop and disconnect power before freeing it.
- Sanding on one corner: flatten the pad and keep it moving.
- Ignoring heat: pause and let the accessory cool before handling it.
After use, disconnect power and clean dust from the tool and vents as the manual directs. Inspect the clamp and accessories, then store blades so their teeth cannot strike one another or exposed hands.
How to use an oscillating multi-tool for your next job
Learning how to use an oscillating multi tool starts with choosing the right setup: pick the DCS356B if you already have compatible charging equipment, or the XR kit if you need it included. Choose the blade assortment only when its cutting tasks match your project.
Before buying, name your first job and the accessory it needs. Compare the best oscillating multi-tools for tool choices, or use the drywall multi-tool guide to plan a wall opening and check for hidden hazards.
Frequently asked questions
What speed should I use on an oscillating multi-tool?
Use the speed recommended for your accessory and material, starting lower when the instructions allow it; raise the speed only while you can guide the tool accurately. If cutting slows, check for a worn blade, trapped debris, or the wrong accessory before adding pressure or choosing a higher setting.
Can an oscillating multi-tool cut wood?
Yes, an oscillating multi-tool can make short plunge cuts and flush cuts in wood with a suitable blade; choose a nail-rated accessory if embedded fasteners may be present, secure the work, and check behind the cut. For long cuts or thick stock, another type of saw may suit the job better.
How do you keep an oscillating multi-tool from jumping?
Secure the material, fit the correct accessory firmly, and make a shallow entry using the starting method in its instructions; keep a steady grip and avoid forcing the blade. If the tool jumps or chatters, switch it off, let it stop, and check the attachment, blade condition, and work support.
Can you use an oscillating multi-tool to cut drywall?
Yes, an oscillating multi-tool can make drywall cutouts with a suitable blade after you locate wiring, plumbing, and framing; limit the cutting depth to the task and don’t plunge into an uncertain space. Our guide to cutting drywall with an oscillating multi-tool explains how to plan the opening.