How to Choose an Oscillating Multi-Tool
Choose an oscillating multi tool around your main jobs, power source and accessory fit. Buy a cordless kit if you need batteries, a bare tool if you already have compatible power, or a corded model for work near an outlet.
On this page (11 sections)
- What should you look for in an oscillating multi-tool?
- Should you choose corded or cordless?
- How much speed control do you need?
- Which accessory system and blades should you compare?
- Do you need a kit or a tool-only model?
- Which grip and visibility features matter?
- Four multi-tools to compare
- How should you set up the tool before the first cut?
- Which mistakes cause poor cuts and wasted accessories?
- How do you care for an oscillating multi-tool?
- Which oscillating multi-tool should you choose?
Choose an oscillating multi tool by matching your main jobs, power source and accessory fit, then compare the controls and complete kit. For most buyers, the first decision is whether they need cordless mobility, already own compatible batteries, or can work near an outlet.
These tools excel at short cuts, flush trimming and detail work where a larger saw is awkward. With suitable attachments, they can also sand corners, scrape residue and remove grout.
If you are deciding between tool types, read our guide to reciprocating saws and multi-tools. For task ideas, see what an oscillating multi-tool is used for.
What should you look for in an oscillating multi-tool?
Prioritize the right attachments, manageable controls and a practical power setup. Those choices affect your work more directly than a high maximum speed or a large accessory count.
| Feature | What to check | Buying decision |
|---|---|---|
| Power source | Outlet access or compatible batteries | Choose around where your work happens |
| Speed control | Trigger, dial or selector | Match the control to short cuts or sustained work |
| Accessory fit | Mounting pattern and adapter requirements | Confirm your needed blades and pads will attach |
| Accessory changes | Wrench-free or wrench-based system | Favor easy changes for mixed cutting and sanding |
| Kit contents | Useful blades, pads, battery and charger | Compare the complete working setup |
| Visibility | Clear view of the blade and cut line | Consider lighting for cabinets and dim corners |
How should you choose an oscillating multi-tool for your jobs?
Choose around the work you'll repeat, rather than every task the tool could possibly handle. Write down your first 3 jobs and the material involved in each.
Trimming a door casing calls for a suitable cutting blade and room to position it flat. Sanding a cabinet corner calls for a pad, matching abrasive sheets and a grip you can hold steadily.
Grout removal needs an accessory intended for grout and enough control to stay clear of tile edges. None of these jobs becomes easier merely because a kit contains several wood blades.
The oscillating multi-tool uses guide can help you sort occasional detail jobs from work better handled by another tool.
For long straight cuts through sheet material, plan on a saw suited to that task. An oscillating tool earns its place through access and control, not by replacing every saw or sander.
Should you choose corded or cordless?
Choose cordless for moving between work areas and corded for sustained work near an outlet. Existing batteries can settle the decision, provided they are compatible with the exact tool.
Cordless power is useful when you move from a doorway to a cabinet and then to a repair upstairs. You avoid routing a cord through each new workspace, but you need a charging plan.
Think about battery sharing, too. One compatible battery may cover occasional repairs, but it becomes a bottleneck if another tool needs it during the same project.
A corded model suits a workbench or room where power is readily available. It avoids charging pauses, though the cord needs a clear route that won't catch, pull against your grip or cross the blade.
For more battery-powered choices, compare our best cordless oscillating multi-tools. If you mainly work near power, see our corded oscillating multi-tool picks.
How much speed control do you need?
Choose a control you can adjust while keeping the tool steady. A variable-speed trigger suits changing pace during a short cut, while a dial lets you select a pace before starting.
A selector and a variable trigger can work together: the selector sets the range, and the trigger adjusts speed within it. That can help when you want to limit speed while easing into a cut.
For longer sanding or scraping sessions, consider how you will hold the control throughout the job. A lock-on function changes that routine, so learn its release before putting an accessory against material.
Does a higher OPM help an oscillating tool cut?
A higher OPM gives you more available speed, but blade choice and feed pressure still determine how the cut progresses. Don't treat maximum OPM as a ranking of cutting ability.
Use the speed recommended for the accessory and material, then make a short practice cut on scrap when possible. Reduce pressure if the blade stalls, chatters or leaves scorch marks.
A dull or unsuitable blade needs attention before a faster setting does. Forcing it into the work can increase heat and make it harder to follow the line.
Which accessory system and blades should you compare?
Choose compatible blades for your actual materials, then consider how easily you can swap them. “Universal” accessory support still requires checking the exact tool, adapter and blade combination.
For clean wood, use a wood-cutting blade suited to the cut. If nails may be present, choose an accessory specifically intended for wood with metal rather than assuming any wood blade will cope.
A wider blade can help guide a straight cut where access allows. A narrow blade is useful in confined spots, but it can wander if you twist the tool to steer it.
Check mounting positions as well as fit. Being able to angle an attachment can help you reach a corner, but the accessory must still clear the tool body and clamp securely.
For sanding, confirm that replacement sheets match the pad's shape and attachment method. An assortment of blades won't cover that need.
Do you need a kit or a tool-only model?
Choose a kit when its included power and accessories fill real gaps, and tool only when you already own compatible essentials. Count what you need for your first project before comparing options.
A starter kit can simplify a first cordless purchase. It is less useful if you already own the same charger and need a different blade from those included.
“Tool only” doesn't always mean no accessories are included. It does mean you should check battery and charger requirements separately, rather than assuming the pictured setup is ready to run.
For corded kits, focus on usable attachments and storage. A large attachment count may include many abrasive sheets, so compare the actual types of work covered.
Keep a short checklist: power, cutting blade, sanding pad if needed, replacement consumables and protective gear. That makes two different kits easier to compare fairly.
Which grip and visibility features matter?
Favor a grip that keeps the blade in view and lets you reach the controls without shifting your hand. Balance matters most in the position you'll use, such as overhead or close to a floor.
If possible, hold the tool with a compatible battery attached before buying. Check whether you can see the intended cut line while keeping your hands clear of the accessory.
An LED helps illuminate a dark corner, but shadows can still hide your mark. Position separate work lighting so the blade and its path remain visible.
Vibration can make precise work tiring. Use a secure grip without squeezing harder than necessary, and take breaks according to the tool's instructions rather than pushing through hand discomfort.
Four multi-tools to compare
Choose among these 4 options by what power equipment you already own and where you'll work. The two DeWalt XR choices mainly present a kit-versus-bare-tool decision, while the Ryobi and corded DeWalt serve different setups.
DeWalt XR Oscillating Tool Kit
Best for first cordless setups
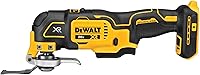
Choose the DeWalt XR Oscillating Tool Kit if you want cordless mobility and need a battery and charger. It includes those essentials, a wood-cutting blade, a wood-and-metal blade, a universal adapter and a kit bag.
Its brushless motor, 3-speed selector and Dual-Grip variable-speed trigger suit buyers who want both a preset range and speed adjustment at the grip. The Quick-Change system needs no wrench, and an LED lights the work surface.
This is a practical starting point for household cutting repairs, especially when you need to move between rooms. Plan separately for sanding or grout work because the included blades don't cover those jobs.
Skip it if you already have compatible DeWalt power equipment and only need the tool. Also consider corded power if your work stays beside an outlet and charging adds no useful freedom.
DeWalt DCS356B XR Oscillating Multi-Tool
Best for DeWalt battery owners
Choose the DeWalt DCS356B if you already own a compatible battery and charger. This tool-only option includes two wood-cutting blades and a universal accessory adapter, with power equipment sold separately.
The brushless tool combines a Dual-Grip variable-speed trigger with ranges of 0–13,000, 0–17,000 and 0–20,000 OPM. It also has wrench-free Quick-Change accessory changes and an LED.
Its main appeal is adding detail-cutting ability to an existing DeWalt setup. The included wood blades can start suitable wood projects, while mixed-material cuts or sanding need the right additional attachments.
Skip it if you need a complete first cordless setup without choosing power equipment separately. Don't choose it over the kit merely because both contain a tool from the same family; compare everything needed to get working.
For more options, compare our best oscillating multi-tools.
Ryobi ONE+ Multi-Tool
Best for ONE+ home repairs
Choose the Ryobi ONE+ Multi-Tool if you already have compatible 18V ONE+ power equipment and want a tool for cutting, sanding and scraping. Its battery and charger are sold separately.
The variable-speed dial reaches 20,000 OPM, while the lock-on button lets you keep it running without holding a trigger. On-board accessory storage helps keep accessories with the tool.
This control layout suits buyers who prefer selecting a pace before starting a task. For longer sanding passes, learn how the lock-on releases and maintain light pressure rather than using the running tool's weight to force contact.
Skip it if you want trigger-based speed adjustment or need a battery and charger in the box. Confirm the required accessory mounting method and your starter attachments before choosing it for a specific project.
DeWalt DWE315SK Corded Multi-Tool
Best for outlet-side projects
Choose the DeWalt DWE315SK if you work near an outlet and want cutting and sanding attachments together. Its 3 amp motor uses a Dual-Grip variable-speed trigger, with no battery charging to plan.
The kit includes wood-with-nails, fast-cut wood and semi-circle blades, plus a sanding pad, 15 sandpaper sheets and a bag. That mix suits projects where you alternate between trimming and smoothing.
Its wrench-free Quick-Change system supports those accessory swaps, while the universal adapter expands accessory choice. An LED helps light the work surface, and the guide system allows depth or height adjustment for repeat cuts.
Skip it if your repairs often move beyond convenient outlet reach. Before starting, route the cord behind your working position so it won't drag across the cut or pull against your hands.
How should you set up the tool before the first cut?
Start with a secure accessory, supported material and a clear cut path. Disconnect corded power or remove the battery before fitting or repositioning an attachment.
Check the accessory for damaged teeth, cracks or a bent mounting area. Seat it fully, follow the tool's clamping instructions and confirm it cannot shift before restoring power.
Clamp loose material where practical, leaving clearance beneath the cut. Don't hold a small workpiece in one hand while bringing the blade toward it with the other.
Mark the cut and check its full depth, including what lies behind the surface. A visible line doesn't reveal hidden wiring, pipes or fasteners.
Put on eye and hearing protection, and use dust control and respiratory protection appropriate to the material. Stop if old coatings or building materials may contain hazards that require special handling.
Make a practice cut on matching scrap where possible. For the working sequence, read our instructions on how to use an oscillating multi-tool.
Which mistakes cause poor cuts and wasted accessories?
The most common mistakes are using the wrong attachment, forcing the cut and losing track of depth. Better technique often helps more than changing to a faster tool.
- Pushing too hard: Let the teeth cut and clear debris as needed. Excess pressure can build heat and reduce control.
- Twisting a buried blade: Stop and reposition rather than using the blade as a lever. Keep the accessory aligned with the cut.
- Cutting deeper than needed: Mark the required depth and inspect the space behind the surface. Use a compatible depth guide where appropriate.
- Sanding with heavy pressure: Keep the pad flat and move it steadily. Pressing on one corner can gouge the surface and wear the abrasive unevenly.
- Scraping at a steep angle: Start shallow to reduce the chance of digging into the base material. Check progress often on surfaces you intend to keep.
- Changing a hot accessory immediately: Disconnect power and let it cool before handling. Keep spare blades somewhere they cannot cut your hands.
Treat changing sound, heavy vibration or slow progress as a reason to stop and inspect the setup. Continuing with a loose or worn accessory can damage the work.
How do you care for an oscillating multi-tool?
Keep the vents, accessory mount and attachments clean, and replace worn consumables before they make you force the tool. Follow the manual for cleaning and any maintenance the tool requires.
Disconnect power, then remove dust with the cleaning method the manufacturer allows. Keep debris out of the clamp so accessories can seat properly.
Inspect the cord or battery connection before use. Don't continue with damaged insulation, loose connections or a visibly damaged battery.
Store cutting blades so their teeth won't knock against other tools. Keep sanding sheets dry and separate sharp accessories from batteries and charging equipment.
For cordless models, follow the battery instructions for charging and storage temperatures. Before a planned project, charge the battery and check that your needed blade is still usable.
Which oscillating multi-tool should you choose?
Choose your oscillating multi tool by power setup first, then controls and job-specific accessories. Use these decision rules to narrow the 4 options without buying equipment you won't use.
- Starting cordless from scratch: Choose the DeWalt XR Oscillating Tool Kit for its included battery, charger and starter cutting blades.
- Already using compatible DeWalt batteries: Choose the DCS356B to add the tool without duplicating your power setup.
- Already using compatible Ryobi ONE+ batteries: Choose the Ryobi if you prefer dial control and want lock-on operation.
- Working near an outlet: Choose the DWE315SK for corded power and a kit covering both cutting and sanding.
Before ordering, name the accessory your first job needs and confirm its fit. Then compare alternatives in our best oscillating multi-tools roundup.
Frequently asked questions
What should I look for in an oscillating multi-tool?
Look for controls you can reach comfortably, an accessory system that accepts your needed blades, and a power source that fits your workspace. Compare the complete setup, including any battery, charger, sanding pad and material-specific blades you still need, rather than choosing by maximum speed alone.
Is a corded or cordless oscillating multi-tool better?
Choose cordless for repairs spread across several rooms or places without convenient outlets, and corded for longer work near reliable power. A compatible battery you already own favors cordless, while starting without batteries makes a complete cordless kit or a corded kit worth comparing.
Does a higher OPM mean an oscillating tool cuts better?
A higher OPM means a faster maximum oscillation rate, not an automatic improvement in cutting quality. Blade choice, tooth condition, material, feed pressure and speed control all affect the result, so choose a tool that lets you adjust the pace instead of chasing the largest number.
Do oscillating multi-tools use the same blades?
No, blade fit depends on both the tool's mounting system and the accessory's connection pattern. A universal adapter can expand your choices, but confirm the exact combination before buying, including whether an adapter is required and whether the accessory can sit at the angle your job needs.