How to Remove Grout With an Oscillating Multi-Tool
An oscillating multi tool for grout removal needs a compatible grout blade narrower than the joint and light, controlled passes. Choose the blade by joint width, corner access, and tool fit, then remove grout to the depth required by the replacement grout.
On this page (9 sections)
- How do you remove grout with an oscillating multi-tool?
- Which blade should you buy for grout removal?
- How do you protect tile while removing grout?
- How deep should you cut into the grout?
- How do you clean the joint before regrouting?
- Can a cordless multi-tool handle grout removal?
- When should you use a hand grout saw instead?
- Which mistakes wear out blades or damage the repair?
- Which oscillating multi-tool setup should you choose for grout removal?
An oscillating multi tool for grout removal works best with a compatible grout blade that fits inside the joint, light pressure, and short passes. Choose your blade around the grout line and nearby tile before choosing a tool.
This method suits isolated repairs and accessible runs of old grout. For a few inches beside fragile tile, a manual grout saw may be the better first choice.
How do you remove grout with an oscillating multi-tool?
Make a shallow guide pass down the center, then deepen it in stages. Clear dust between passes so you can see the joint and stop at the required depth.
- Check for loose tiles, cracks, and damaged joints before starting.
- Put on eye protection and suitable respiratory protection, and arrange dust extraction.
- Disconnect power or remove the battery, then mount a compatible grout blade according to the tool manual.
- Position the blade in line with the joint and start at a low speed allowed by the blade instructions.
- Guide it forward with light pressure, stopping before intersections until you can reposition.
- Extract debris, inspect the edges, and repeat only where more grout needs removing.
Keep the work area dry and the tool away from standing water. See how to use an oscillating multi-tool for setup and grip guidance.
Which blade should you buy for grout removal?
Buy a dedicated grout removal blade that leaves clearance between its cutting edge and both tiles. A general wood cutting blade isn't a substitute for a grout accessory.
Check several points along the joint, including narrow sections and intersections. The tightest area determines whether a blade will fit safely.
Choosing an oscillating multi-tool blade for grout removal
Start with joint width, blade shape, and mounting interface. Diamond or carbide matters after those checks, since neither can make an oversized blade fit.
“Universal” fitment still calls for checking your exact tool model. Some mounting systems need an adapter, and Starlock compatibility must be confirmed separately.
DeWalt Carbide Grout Blade: Choose the DWA4220 for general grout removal when you want one dedicated carbide-edged accessory. DEWALT describes its fitment as compatible with major oscillating tool brands without an adapter.
Skip it if you need several blade shapes for a repair with many corners. Confirm its working width fits your joints before ordering; broad tool compatibility doesn't guarantee tile clearance.
LEILUO Diamond Grout Blades: Choose this set for repairs with both straight runs and awkward corners. The flat and curved profiles give you ways to approach different parts of the joint without forcing one shape through every turn.
Skip this set for a Starlock tool, which it doesn't fit. Dremel tools require the included C-clip adapters, so account for that extra mounting step before starting.
LEILUO recommends low or medium speed, light pressure, and a slight lateral swinging motion. Keep any movement within the open joint rather than sweeping toward the tile edges.
EZARC Diamond Grout Blades: Choose these for short joints, edge work, and repairs where a narrow cutting path matters. Their approximate 1/16 in (1.6 mm) kerf gives you a useful measurement to compare with your grout lines.
Skip them if your joint leaves no clearance around that cutting path. The set includes 2 adapters, but Bosch compatibility is limited to non-Starlock interfaces.
How do you protect tile while removing grout?
Protect tile by controlling the blade's position, especially at corners and the ends of each pass. Tape can mark a boundary, but it won't stop a powered blade from damaging tile.
Brace your hands in a comfortable position before starting the motor. Avoid reaching so far that your grip becomes unsteady, particularly on vertical joints.
Stop the tool before lifting the blade out of a tight joint. At intersections, approach from each direction separately rather than turning the running blade through the crossing.
Grout removal creates fine dust, and some materials contain respirable silica. Use extraction suitable for fine masonry dust and respiratory protection selected for the material and task, and keep others out of the work area.
How deep should you cut into the grout?
Remove grout to the depth required by the replacement grout, while keeping clear of the backing and waterproofing. There isn't one safe cutting depth for every tiled surface.
Read the grout instructions before starting so you know what space the repair needs. Then check progress at several points rather than judging the whole joint from one deep spot.
Slow down near loose tiles or areas with missing grout, where the blade can drop unexpectedly. Stop if you expose a membrane, reach backing material, or see fresh edge damage.
Cracked grout around a moving tile needs more than a refill. Resolve the movement or underlying repair before putting new grout into the joint.
How do you clean the joint before regrouting?
Remove loose fragments and fine dust so the replacement grout can fill the prepared space. Follow its instructions for cleaning and whether the joint should be dry or damp.
Extract debris as you work rather than waiting until every joint is cut. Packed dust hides shallow sections and makes it harder to see where the blade is going.
Avoid compressed air and dry sweeping, which spread dust through the room. Use cleaning methods allowed by the grout instructions without flooding the open joints.
Inspect the full length under good light before filling. Remove remaining loose material by hand where needed, and allow any required drying time.
Can a cordless multi-tool handle grout removal?
A cordless multi-tool suits small repairs and work away from an outlet, provided it accepts the right blade. Speed control and a steady grip matter more than running at maximum speed.
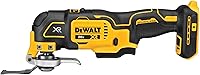
The DeWalt DCS356B XR has a 3-speed selector, a variable-speed trigger, an LED, and a quick-change accessory system. These features suit buyers who want to adjust speed during detailed work and change attachments without a wrench.
Choose it if you already have compatible DEWALT 20V MAX batteries or plan to buy the battery and charger separately. Its included wood cutting blades don't prepare it for grout removal; you still need a suitable grout blade.
Skip this tool-only option if you want everything needed in one box. Read the DeWalt DCS356B review for a closer look before committing to that battery setup.
For other tool options and uses, see what an oscillating multi-tool is used for and our guide to the best oscillating multi-tools.
When should you use a hand grout saw instead?
Choose a hand grout saw for tight clearances, delicate edges, and tiny repairs. It also helps finish spots where a powered blade would touch adjacent tile.
A powered tool makes sense for longer accessible runs. Switching between power and hand tools within one repair is often more practical than trying to finish every inch with the same blade.
Check that the manual blade also fits the joint. Hand pressure can still chip an edge if you wedge or twist the blade against it.
For jobs beyond grout, compare oscillating multi-tool uses with the uses of a reciprocating saw. A reciprocating saw's cutting action doesn't suit these narrow tile joints.
Which mistakes wear out blades or damage the repair?
The main mistakes are forcing the blade, cutting blind through dust, and using excessive speed. If progress slows, stop and inspect the setup before pressing harder.
Heavy pressure can pull the tool off line and increase heat. Let the abrasive edge work, and pause if the blade becomes hot or removal slows.
Disconnect power before checking the mount or clearing debris from the accessory. Let the blade cool before handling it, then inspect for damage and clean it according to its care instructions.
Don't continue with a loose mount or damaged blade. Store accessories dry and protect their cutting edges from knocks between jobs.
Which oscillating multi-tool setup should you choose for grout removal?
Choose your oscillating multi-tool for grout removal setup by the joint first: width, access, and tile condition decide what you can use. Keep a hand grout saw available for any section where the powered blade lacks clearance.
Pick the DeWalt carbide blade for general removal, LEILUO for mixed straight and corner work, or EZARC when its narrow kerf suits your detail repair. Choose the DCS356B if you also need a cordless tool and have accounted for its separate battery, charger, and grout blade.
Before buying, measure the tightest joint and check your tool's mounting interface. For other cutting jobs, our guide to oscillating multi-tool uses explains where this tool fits.
Frequently asked questions
Can you remove grout with an oscillating multi-tool?
Yes, an oscillating multi-tool can remove grout with a compatible grout removal blade that fits inside the joint; start with a shallow pass along the center, use light pressure, and extract dust as you work. Finish tight corners by hand if the powered blade cannot stay clear of tile.
Is a carbide or diamond blade better for grout removal?
Choose by joint width, blade shape, and tool fit before choosing carbide or diamond; both are used for grout removal. Diamond grit blades offer options for narrow joints and detail work, while a carbide-edged grout blade suits general removal when its profile fits the joint and your tool.
How deep should you remove grout?
Remove grout to the depth required by the replacement grout's instructions, without cutting into the backing or waterproofing; check depth in several places because joints can vary. A shallow groove may leave too little room for new grout, but cutting deeper without checking can damage the surface beneath it.
How do you keep an oscillating tool from chipping tile?
Keep a correctly sized grout blade centered in the joint and make short passes with light pressure; support your grip so the tool cannot lurch at an intersection. Reposition for corners instead of twisting the blade, and switch to a hand grout saw wherever powered work leaves too little clearance.